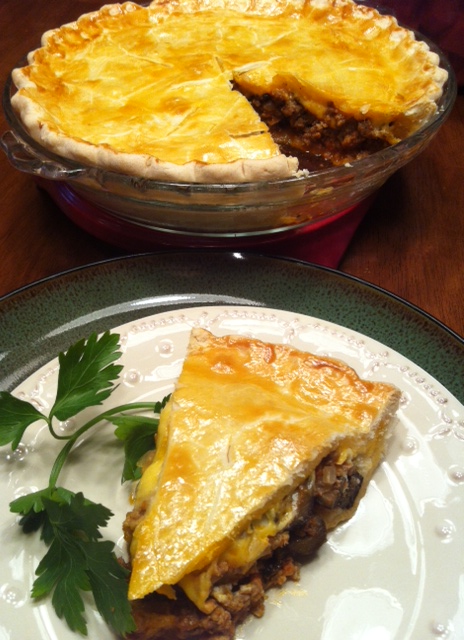
Amazing Cheeseburger Pie

A few days ago, my husband brought a letter home for me from a co-worker named Vicky.  Enclosed, along with the sweetest letter was a recipe for cheeseburger pie.  Upon first glance, the recipe seemed a little plain but I knew if Vicky had included it, it must be something I had to try.  I bought all of the ingredients and made it the next day.  It was very easy to throw together and made the most delicious comfort food I have had in a long time.  It was truly fabulous and will forever be a staple in our home.  Vicky, I can not thank you enough for sharing such a wonderful recipe with me (and for giving me permission to share).

Ingredients:

1 package of pre-made pie crust (feel free to make your own.  I had never used pre-made before but was pleasantly surprised at how good it was since I am generally not a big fan of the pre-made crusts/doughs. You can also use 2 packages Crescent rolls, just remember to grease your pan if you do.

1 lb ground beef

1 cup (8oz.) tomato sauce

1 medium onion, chopped

1 can mushrooms (optional)

1 small can sliced black olives

2 eggs

7 slices of cheddar or American cheese

salt and pepper to taste

Directions:

Place one crust in the bottom of your pie pan.  Push it against the sides to secure it.  If you are using crescent rolls, use one package for the bottom crust, pinching the seams together.

Brown hamburger with onions.  Add mushrooms.  Drain hamburger and add olives and tomato sauce.  Add salt and pepper here too to taste. Heat until warm, pour onto bottom crust.

Beat one egg and one egg white well (do not discard the unused yolk).  I have never owned an egg separator because I feel like my fingers work just as well and it dirties one less dish.  Just crack the egg in half, removing the top half of the shell over a bowl.  Turn the egg out into your fingers and let the white fall through your fingers.  Drop the yolk back in the half shell until you are ready to use it.

Pour egg over the top of the hamburger mixture.  Add cheese slices, laying evenly across the top.

Place top crust over hamburger.  Fold edges over the bottom crust and pinch them together until the whole thing is sealed.  Crimp edges using the knuckle of your left hand (or right if you are a lefty) and pinch with your right hand around the whole crust.

Brush egg yolk over the top of the crust and cut slits in the top so your pie can vent.

Bake at 325 degrees F for 40-50 minutes until it is nice and golden brown.  Let the pie cool for 10 minutes, then serve.
Three Cheese Vegetarian Lasagna

I created this recipe a few years back when I was asked to provide a vegetarian dish for an event I was catering.  I am a meat and potatoes kind of girl so I don’t cook many vegetarian dishes.  I tested the recipe out on a few friends and my hubby who are all complete meat lovers and they all loved it.  After the catering event, I kept receiving comments about how big of a hit the vegetarian lasagna was.  Even though there were only a handful of vegetarians attending, the 2 giant pans I made were devoured.  I know there are so many people going meatless these days so this is a great recipe to add to your collection.  It is really hearty and has a great dept of flavor so even if you are not a vegetarian, you will love it.

Ingredients:

9-12 lasagna noodles (I like the wavy kind because they give your dish more body).

2 Tbsp olive oil

1 can NON-marinated artichoke hearts

1 cup chopped onion

1 and 1/2 Tbsp minced garlic

6 cups fresh spinach

1 heaping cup of mushrooms of your choice (or more if you would like), diced

3 cups cottage cheese (or ricotta if you prefer)

2/3 romano cheese, grated

1 tsp salt

1 tsp dried oregano

1 tsp dried basil

1/2 tsp pepper

1 egg

3 cups mozzarella, grated

1 cup parmesan, grated

1 egg

1 jar of your favorite spaghetti sauce

Directions:

Pre-heat oven to 350 degrees F.

Boil noodles with 1 Tbsp salt.  Drain. Set aside.

Grate cheeses

Clean mushrooms by rubbing them with a wet paper towel from the top-center, down as they have tiny little fibers that get all ruffled if you go against the grain.  Don’t run water over your mushrooms because they will absorb the water.  When your picking out your mushrooms, make sure you choose ones that are completely sealed under the cap, are firm and have no bruises. Trim off the end of the mushroom and dice.

Drain artichokes and run your knife through them a few times to break them up.

Chop onions.  Remember that the closer you get to the core on the root end, the more gases the onion releases (making you cry), so with the root side down, make 1/4-1/2″ incisions down into the onion being careful not to cut all the way through turn 90 degrees and repeat.  Turn onion on its side and slice through making perfect little tiny squares. No tears.

In a skillet, over medium heat, cook mushrooms, artichokes, onions, and garlic in olive oil until onions are tender.  Drain any excess liquid and set aside to cool.

Measure spinach into a microwave-safe bowl.  Microwave on high for one minute.  Let stand in microwave for another minute or two then remove and squeeze the spinach, draining all of the juice.  You will notice that your six cups of spinach has now reduced to less than 1 cup. This is an important step because you don’t want any extra liquid in your lasagna or you will end up with soup that runs all over your plate.   Chop drained spinach.  If you are a spinach lover, feel free to use as much spinach as you want, just be sure it is drained thoroughly.

Combine cottage cheese (or ricotta if you choose), romano cheese, chopped spinach, salt, oregano, basil, pepper and egg.  Mix just until combined.  Add artichoke mixture and beat on low-speed for one minute.  Some cottage cheeses are runnier than others so if your cottage cheese has much liquid in it, drain it using a mesh strainer.  Just stir it in the strainer over a bowl and the milky liquid will drain out.

Spread a thin layer of sauce over bottom of 9×13 pan.  This will ensure that your noodles to stick to the bottom. Lay 3 noodles down onto the sauce.

Split your cottage cheese mixture into three equal parts.  Spread one part onto noodles.  I find that using my hands is the most efficient method.  I just kind of sprinkle it on there and then spread it evenly with a rubber spatula.

Top cottage cheese mixture with 1/3 of the remaining sauce.

Sprinkle with 1/3 of grated mozzarella and parmesan.

Repeat layering process starting with noodles 2 more times. (Okay, don’t tell anyone but I cheated and stacked 2 pieces of lasagna on top of each other for the main picture.  If you want your lasagna that thick, you will need to use a deep pan like a roasting pan and double your ingredients :))

Spray a piece of aluminum foil with non-stick cooking spray (VERY important, otherwise half of your cheese ends up on your foil.)

Cover and bake for one hour at 350 degrees.  Remove foil and bake for an additional 10 minutes.  Remove from oven and cool for 15 minutes before cutting and serving, allowing the lasagna to set up properly. Serve with rosemary french rolls and a side spinach salad.

The Easiest Way To Cut A Watermelon

Watermelons can be such a pain to cut.  Most of the time you either end up scooping all of the fruit out in big uneven chunks or you use a melon-baller which leaves you with a lot of wasted melon and seems to take forever.  This way is super fast and easy and takes all of the hassle out of cutting up that big juicy melon.


First of all, when picking  a melon you want to always look for a melon that has a big yellow spot on one side.  This will tell you that the melon ripened on the vine (the yellow spot is where it sat on the ground).  If it is all green, chances are, it ripened off of the vine and won’t be nearly as sweet.  The next thing I do is look for a melon with “bee stings”.  These are brown lines on the melon that cause small indentions (see picture).  Evidentially bees like the sweet melons… AND if there happens to be sugar balls (looks kind of like sap) coming from these bee stings, that is said to be sugar leaking out of the melon.  I will usually find a few like these and see which is the heaviest which shows that it is extra juicy.  A lot of people knock on the melon to see if it sounds hollow which I know works but for some reason they always sound the same to me so I generally don’t use this technique.  I don’t know if this is all scientifically correct with the bees and all but I generally pick good ones using this method.

Always wash the melon.  Even though you don’t eat the rind, it usually ends up touching the same parts of the cutting board that the juicy little squares touch, plus many are imported from Mexico so I always give them a good scrub with a tiny drop of dish soap.

Alright, on to the cutting.  Using a large sharp knife, cut the melon in half.  Move one half off of the board and cut the other half in half again.


Now make 1″ incisions down through the whole watermelon quarter being careful not to cut too far into the rind.  Turn the watermelon 90 degrees.  Turn your knife on its side and make incisions 1″ apart through one side then turn and make the same incisions down through the other side.

Now, run your knife just inside the rind and dump the squares into your bowl.  Repeat with the rest of the quarters.


Grilled Wild Turkey Rolls

Since I have been the queen of slacking on my blog lately, I decided that since I had reached over 10,000 views, I really need to get back in the saddle and give all of my amazing faithful followers some more yummy recipes.  Would you believe me if I told you that I was just giving you all time to try all of my recipes for the past month so I wouldn’t overwhelm you with new recipes? ….No?… Well, it was worth a try 🙂 My camera is at maximum capacity with all of the pictures of the yummy recipes I have for you.  If I only had a little elf who could take all of the thoughts and recipes out of my head along with the pictures from my camera and post them for me.

This recipe was so off the charts-amazing! My husband, Shawn went turkey hunting in Kansas City and brought home a beautiful giant turkey.  I had no clue what to do with it as I have never cooked wild turkey before.  Word on the street was, I had to marinade the breasts, cube it and wrap it in bacon with a slice of jalapeno.  I didn’t know what marinade to use so I made one myself and the whole package was dyne-o-mite!

Of course, most of us don’t have wild turkey breasts readily available; however, I am totally convinced you could wrap anything in bacon and add a jalapeno and it would be fabulous.  I also heard that adding a little cube of cream cheese in the middle makes them Turkey Poppers *drool*.

Ingredients:

Marinade:

1/4 cup olive oil

2 Tbsp white vinegar

2 Tbsp Worcestershire Sauce

1/2 tsp ground pepper

2 cloves minced garlic or 1 tsp garlic powder

1 tsp salt

1 Tbsp brown sugar

1 lb thick cut peppered bacon.  You will get 2 rolls for each piece of bacon so plan accordingly with the number of mouths you will be feeding.  I ALWAYS buy my bacon at the butcher counter.  At most grocery stores, you can find super thick, meaty, peppered bacon for right around the same price (or cheaper when it’s on sale) as the pre-packaged bacon where you get 2 square inches of a window to guess if the bacon actually looks that good or if they have laid it in such a way that the only actual meat on the bacon is showing in that little window.  Seriously, that just isn’t fair.

1 can pickled, sliced jalapenos.  If you are not a big fan of super spicy stuff, get the “tamed” jalapenos.  They still have all that yummy flavor without lighting your mouth on fire.

1-1 and 1/2 lbs wild turkey breast or meat of your choice. Again, plan accordingly with your bacon slices.  You will be cutting your meat into 1 and 1/2″ cubes.  I think sirloin, chicken breast, turkey breast, and venison would all be really delicious choices.   The turkey breast I used was somewhere around 2-3 lbs so I had about 1 lb extra marinated meat I just froze for next time.

Directions:

Cut meat into 1 and 1/2″ cubes.  Mix marinade.  Let meat marinade for a minimum of 2 hours. (Seriously, check out that giant turkey breast! It took up my entire cutting board!)

Cut each piece of bacon in half.  Place one slice of jalapeno and once cube of turkey into center of bacon slice.  Tightly roll bacon over turkey and hold in place with a toothpick.

After cleaning your grill, heat grill to medium heat (around 300-350 degrees).  Place rolls on sides and cook slowly turning every few minutes.  Be sure to keep a spray bottle handy because you will be chasing flare-ups from the bacon grease the entire time.  Once, the bacon is fully cooked, your meat should also be fully cooked.  Let stand for 5 minutes before serving.  If you are making these for party favors, they will stay plenty juicy in a warm oven until ready to serve.  They are also really amazing the next day so don’t throw out your leftovers!

The Garden Is In!!!!!

I can’t even begin to explain how excited I am right now.  It has been my dream for so many years to have a beautiful vegetable garden.  My sweet, wonderful husband built me 3 giant raised garden beds over the weekend and our little family of four worked our hineys off shoveling 6 yards of soil into the beds.  The boys and I went to a local nursery today and picked up our plants and seeds.  We got them all laid out according to my garden map and planted them as soon as the gardens were shaded this evening.  I really hope that I am successful at this.  In our garden, we planted strawberries, red potatoes, red bell peppers, green bell peppers, jalapeno peppers, mini sweet peppers, bush cucumbers, pickling cucumbers, green and yellow zucchini, garlic, red onions, French green beans, garden beans, sugar snap peas, broccoli, carrots, 6 types of tomatoes, spinach, basil, rosemary, Italian parsley, and chocolate mint.  WHEW! I am hoping at least half survive 🙂 Here are a few pictures of the whole process.  Hope you all have a great week in the beautiful sunshine!

Here are the empty boxes and a picture of my wonderful hubby scooping shovels full of soil from truckload 1 of 3.

My boys Wyatt and Henry with their shovels helping move the soil to the back of the beds.  They helped all day long and worked so hard… love those little stinkers!


Wyatt and Henry both helped me plant all of the seeds today.  I know they won’t be perfectly spaced but it was so worth it seeing how proud they were to get them all covered up.

All done.  Now if these are the last pictures you see of my garden, you will know that everything died 🙂 If we have a little luck on our side, I will keep you all posted on my progress and hopefully be including some yummy fresh recipes with the fresh fruits and veggies.  Someday I may even get a picture of myself on my blog.  I seem to always be hiding behind the camera so none of our pictures ever include me.  I kind of prefer it that way, but my children are going to wonder why none of their childhood pics had Mommy in them.  Anywho, if anyone has any great tips that will help me improve my gardening success, please share!

Simply Delicious Vegetable Barley Soup

A few weeks ago, I was at one of my favorite restaurants, dying to have a bowl of their always-amazing soup and a few slices of their homemade bread.  I asked what their “Soup of the Day” was and as she said “Cream of Broccoli and Vegetable Barley,” I felt the wind quickly escape my sails.   Neither of them sounded good to me since I have never been a big broccoli fan and though I had never had it, the barley soup just didn’t sound appealing.  I was really hoping for German Potato or Clam Chowder… something hearty, but I reluctantly ordered the vegetable barley soup because I like their homemade bread and real butter so much.  I was so glad I ordered it because I LOVED it!  I attempted to replicate it tonight and was so excited when I took my first bite.  I actually liked it even more than the soup I was served at the restaurant.  It is really savory and  surprisingly hearty, but really healthy at the same time.  This was a quick soup to throw together, however, it does have to cook for 90 minutes so it takes a little while to get to the end product.  I’m sure this would be great in the crock pot too.

Ingredients:

8 cups water

2 Tbsp chicken base (or use 8 cups chicken broth)

1 cup uncooked barley

1 onion, chopped

2 stalks celery, chopped

2 large carrots, chopped

1 tsp salt

1/2 tsp pepper

1 tsp sugar

1 tsp Worcestershire Sauce

1 tsp garlic powder

1/4 cup fresh parsley, chopped

1 tsp paprika

3 bay leaves

Directions:

Prepare all vegetables.  In a large pot, combine hot water and chicken base (or broth).  Add barley, chopped vegetables and spices.

Bring to a boil over medium-high heat then cover and reduce heat to medium-low.  Simmer for 90 minutes.  Feel free to add more veggies if you please (stewed tomatoes, zucchini, mushrooms, green beans, etc.)  Also, beans and/or some pre-cooked beef would be great additions.


Tuna Pizzas

Alrighty, as I mentioned in my previous post, I wanted to share 2 beloved recipes from my childhood, both including the infamous fish of the tuna variety.  This recipe always gets big cheers from my boys. It is also wonderful for those nights when the last thing you want to do is stand in your kitchen preparing a meal that is followed by a sink full of dishes.

 Ingredients:

2-7 oz cans tuna fish (again, I use solid white albacore but any kind works)

3 English muffins, split

1/4 cup mayonnaise (I really like the mayonnaise made with olive oil)

6 slices of cheddar cheese

1 thinly sliced tomato (optional)

salt and pepper to taste

Directions:

Start by lining a baking sheet with foil for easy clean up.  Mix together tuna, mayo, salt and pepper.

Divide tuna mixture onto 6-split muffin rounds and place on baking sheet.

Top with cheddar cheese.

Bake at 375 degrees for 10-15 minutes or until cheese is melted and bubbly.

Serve with sliced tomatoes, a little sprinkle of salt and pepper and some oven fries (loving sweet potato fries! I have a recipe awaiting trial that I will hopefully be blogging in the near future).

Creamy Tuna Casserole

Where have you been????  I know… I think I may have literally dropped off the face of the earth.  The truth is, my husband travels A LOT for work and we had a few weeks where he was home almost every night.  I just needed to soak it all in and that is just what I did.  🙂 Now that he is safely in tornado-ville for the week (yikes), I feel so anxious to blog all of the recipes I have been selfishly keeping locked in my little camera.  I have so many to share, I don’t even know where to start.  At least I can rule a few out because a lot of my recipes are born in my kitchen the day I cook them and since I have the worst (no, really, THE WORST) memory, some will have to wait until next time because I won’t remember what I put in them.  I do this thing where I make something and the little angel on my right shoulder whispers “maybe you should write this down” but then the “other guy” on my left shoulder will reassure me that I will for sure be able to remember all of these ingredients and their amounts.  Give me an hour around my children and …whooosh… gone!  It really is like magic the way my brain works.  One minute it’s there, the next, like it never even happened.  Ask my husband, he would be more than happy to verify this and can probably give you a couple of daily examples… Okay, on to food!!!

I know there are a few anti-tuna fish people in this world.  You either love it or you hate it.  I happen to love it.  And for those of you who agree with me, my next 2 posts are really yummy, quick and easy recipes from my childhood that can be thrown together in a few minutes, and with a little oven time, result in a delicious dinner that the whole family will love (unless of course one of those family members hates tuna :))

Ingredients:

2-7 oz cans tuna-fish (I use solid white albacore but any kind will work)

1/2 cup low-fat sour cream

1 cup milk

2 Tbsp heavy cream (I know it seems funny after using low-fat sour cream but I accidentally came upon this combo when trying low-fat sour cream one time in the recipe.  It wasn’t nearly creamy enough so I added the heavy cream to compensate and the results were perfect.)

1/2 tsp salt or more to taste

1/2 tsp pepper

1 cup Italian breadcrumbs

1/3 cup shredded Parmesan cheese

2 Tbsp melted butter

1-16 oz bag extra-wide egg noodles

1 Tbsp salt (for noodle water)

Directions:

Cook noodles as directed on package in salted water.  While noodles are boiling, mix tuna, milk, heavy cream, sour cream, salt and pepper in a casserole dish.  Mix until well combined.

Drain noodles and add to tuna mixture. Set aside.

Stir together breadcrumbs and Parmesan cheese.  Add melted butter and stir until crumbly.

Top tuna/noodle mixture with breadcrumb mixture and bake at 350 degrees F for 20-25 minutes or until breadcrumbs are golden brown.

Sweet Chili Sauce

I made this sauce for the first time with my Heavenly Coconut Chicken recipe and really loved it.  It came from WOOBSIEE at Allrecipes.com.

Ingredients:

1/2 cup water

1/2 cup rice vinegar

1/2 cup sugar

1 tsp fresh ginger root, minced

1 tsp minced garlic

1-2 tsp hot chile pepper, minced (I used chili garlic sauce found in the Asian food section)

1 tsp ketchup

2 tsp corn starch

Directions:

Pour water and vinegar into a saucepan, and bring to a boil over high heat.  Stir in sugar, ginger, garlic, chile pepper, and ketchup; simmer for 5 minutes.  Stir in cornstarch.  Remove saucepan from stove to cool.  Transfer to a bowl, cover and refrigerate until needed.

Great with coconut chicken or shrimp, spring rolls, chicken strips, etc.

Heavenly Baked Coconut Chicken

Do you like coconut shrimp? I am semi-obsessed with it, not because of the shrimp, but because of what is on the outside of the shrimp.  This recipe was passed on to me by a friend of mine.  I made it the very next day.  Let me tell you…it was every bit as good as the best coconut shrimp I’ve had, but the wonderful thing was, it was baked and had no added fat.  It was crispy, and well… just plain wonderful.  Thanks for the recipe Jessica! You have made my world a happier place 🙂

Ingredients:

2 chicken breasts

4 cups corn flakes

2 cups coconut

1 and 1/2 tsp ground ginger

1 tsp salt

1/2 tsp pepper

2 eggs, beaten

2 Tbsp milk

Dipping sauce of your choice… I used honey mustard and a sweet chili sauce (recipe coming soon)

Directions:

Preheat oven to 375.  Spray a baking sheet with cooking spray.  In a resealable bag, crush corn flakes (rolling pins work great).  Add coconut, ginger, salt and pepper. Shake until well mixed.  In a shallow bowl, mix eggs and milk.

Rinse, trim and pat chicken dry with a paper towel.  Slice in  1/2 inch thick pieces at a 45 degree angle.  Dip chicken pieces in egg.  Let egg drip off then individually press chicken pieces into coconut mixture until well coated.  Place on prepared baking sheet and bake for 12-14 minutes.  Turn chicken pieces over and turn your oven to broil.  Broil until bottom side (now top side) is golden and crispy.

Serve with your favorite dipping sauce or atop a salad.  A-MA-ZING!!!!!