Aebleskivers – Dutch Pancakes

nutella filledjelly filledHappy New Year!!!  I hope you have all had an amazing time celebrating with family and friends. We spent the countdown at home this year with our 2 boys.  This was the first year that they actually made it until midnight (or technichally the first year that we haven’t tricked them with the East Coast countdown.. heehee).  We had a fondu night complete with cheddar beer fondu, beef broth fondu (for steak) and my favorite, chocolate fondu with lots of fruit and donut holes for dipping.  It was such a fun night full of games, music and of course food.

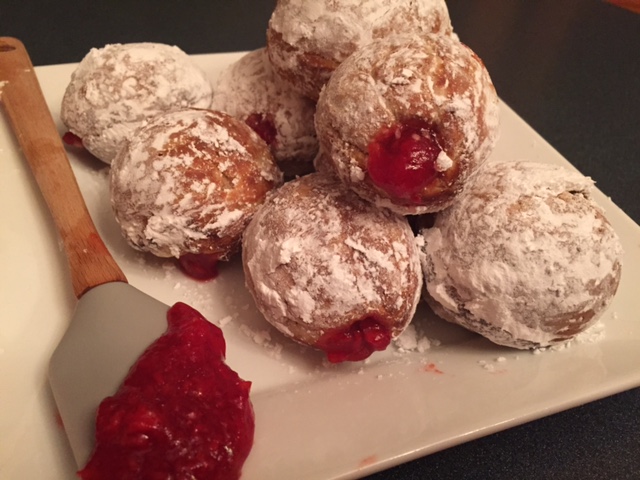
Breakfast consisted of bacon, eggs and these delicious gems called Aebleskivers [pronounced eb-el-skee-vers].  These Dutch pancakes do require a special pan if you want to make them round (you can technically just cook the batter flat on a skillet), but if you have the chance to pick one up, you are in for a treat! pan I purchased mine (actually my sweet momma bought it for me) from World Market.  I understand William Sonoma and Amazon also sell them.  These are to die for!  They are slightly crisp on the outside and dense yet fluffy on the inside.  Generally, they are served rolled in powdered sugar with some kind of fruit preserves (or Nutella).  You can also just serve with butter and syrup.  I like to pipe preserves or chocolate into the center of the pancake for a little extra wow factor.

Historically, Aebleskivers were made in hammered copper pans but today, the pans are generally made from cast iron or aluminum with a non-stick coating.  You will also want to have something to turn them with.

stick I used a little wooden stick I had for making caramel apples.  You can also use a chop stick, a fork or even a knitting needle if you really want to do it like  a pro.

These are such a fun treat! They are a blast to make and even more fun to eat.  There are several different recipes online, most call for either yeast or baking powder as the leavening agent.  I can’t wait to try the yeast ones but the baking soda ones apparently require a little less effort.

Ingredients:

2 1/2 cups all-purpose flour

6 Tablespoons sugar

5 1/2 tsp baking powder

1/2 tsp cinnamon

1/2 tsp salt

2 large eggs

2 cups milk

4 Tbsp melted butter

Directions:

dry ingIn a mixing bowl, mix all the dry ingredients together (flour, sugar, baking powder, cinnamon, and salt).  wet into dry ingIn a separate bowl, whisk butter, milk and eggs together.  Add liquids to dry ingredients until evenly moistened.

butter panfill cups

Place aebleskiver pan over medium-low heat.  When pan is hot enough to make a drop of water dance, brush pancake cups lightly with melted butter and fill each to slightly below the rim with batter.

first turn

Cook for approximately 1 minute then poke your dowel (or whatever you are using) into the center of the batter and pierce the bottom.  Gently pull shell to rotate pancake until about half the cooked portion is above the cup rim and uncooked batter flows down into the cup.

turn all

ballsCook until crust on  bottom of ball is again firm enough to pierce then rotate ball with skewer until ball is closed.  Continue cooking, rotating the ball if needed until the batter in the center is completely cooked.  You will want to pull one of the pancakes apart slightly to test the center.

fill nutella

rolled in psAt this point, you can pipe filling into the center.  Roll in powdered sugar if desired.  Serve warm.

Aebelskivers

  • Servings: 6-8
  • Difficulty: moderate
  • Print

Ingredients:

2 1/2 cups all-purpose flour

6 Tablespoons sugar

5 1/2 tsp baking powder

1/2 tsp cinnamon

1/2 tsp salt

2 large eggs

2 cups milk

4 Tbsp melted butter

Directions:

  1. Mix all dry ingredients together in a bowl.
  2. Mix all wet ingredients together in a separate bowl.
  3. Pour wet ingredients into the dry ingredients and stir until completely combined.
  4. Heat pan on medium-low heat until hot enough to make a drop of water dance.
  5. Using a 1/8th measuring cup or ladle, fill each half sphere in your pan almost to the top.
  6. Let cook for approx. 1 minute or until a good crust forms on the bottom of the pancake
  7. Pierce your skewer into the bottom of the pancake and swipe it up, turning it 1/4 of a turn so that the batter once again fills the half-sphere.
  8. Let cook for at least another 30 seconds before turning again to complete the ball.
  9. At this point, you will just keep cooking and turning until the inside of the ball is completely cooked (you can test this by poking with a toothpick or splitting one slightly and peeking inside.
  10. Remove from pan.
  11. Pipe with filling if desired.
  12. Roll in powdered sugar.
  13. Serve warm.

I found this recipe here http://www.myrecipes.com/recipe/danish-pancake-balls-aebleskiver.


Quick and Easy Pumpkin Pancakes

Maybe I should have called this Pumpkin Month since it seems like it is going to take me a whole month to get around to blogging a weeks worth of recipes.  Thanks everyone for always being so loyal in following my blog even though my life gets busy and I have to put it on the back burner sometimes.  I love blogging so much and wish I had more hours in my day so I could have a daily recipe for you.  Oh well, we do what we can I guess.

It has been so hard deciding which pumpkin recipes to make for this series.  There are so many good ones!  One thing I knew for sure was that I had to blog pumpkin pancakes.  Nothing says fall like pumpkin pancakes on a crisp Sunday morning.  These are super fast to make and are always a huge hit! The beauty of pancake mix is that you can play around with so many different ingredients.  For example, instead of adding pumpkin and spices you can add mashed ripe bananas, cooked oatmeal and cinnamon OR applesauce, oatmeal and cinnamon.  Just always reserve some of the liquid recommended on the package recipe until the very end so you can be sure to accommodate for the extra moisture from the added ingredients.  Pancake mixes are very forgiving so if you find it’s too thick, add more liquid, if it’s too thin, add a bit more mix.

Ingredients:

3 cups Bisquick (or your favorite pancake mix, *see below for tips*)

3 eggs

1 and 1/2 cups milk

***** these are the Bisquick package directions, you will add the following ingredients below to the mix of your choice along with any other ingredients called for on the package directions)

1 cup pumpkin puree

2 tsp cinnamon

1/2 tsp cloves

1/2 tsp nutmeg

1 tsp vanilla

Directions:

Mix all dry ingredients.  Add eggs, milk, pumpkin and vanilla, reserving some of the milk (or water) until the end so you can get the consistency you desire.  I prefer my pancakes thick and fluffy, you may prefer to add a bit more liquid for a thinner pancake.

Heat pan or skillet over medium heat for several minutes to evenly heat the pan.  If you start your pan too hot, your pancakes will brown too quickly and result in a gooey center.  Flip when undersides are golden brown and repeat on other side.  Serve with a slab of butter, a dusting of powdered sugar and some real maple syrup…. MMM.. MMM.. MMM! Breakfast is served!

These also freeze well so if you have extras, throw them in a freezer bag and then pop in the microwave for a quick, yummy breakfast.

How exciting! This recipe has been featured on some awesome blogs.  Stop by and check them out!

topdreamer.com/irresistibly-delicious-pancake-recipes/

canopi.com/content/2013/9/25/15-mouth-watering-pumpkin-recipes/

bust.com/10-quick-and-easy-meals-to-make-with-pumpkin-bigpumpkin.html

diycandy.com/2013/09/20-delicious-pumpkin-recipes-fall/?pid=302

http://homeandheartdiy.com/pumpkin-pancakes/

Quick and Easy Pumpkin Pancakes

  • Servings: 5-8
  • Difficulty: Easy
  • Print

pumpkin pancakes

Ingredients:

3 cups Bisquick (or your favorite pancake mix, *see below for tips*)

3 eggs

1 and 1/2 cups milk

***** these are the Bisquick package directions, you will add the following ingredients below to the mix of your choice along with any other ingredients called for on the package directions)

1 cup pumpkin puree

2 tsp cinnamon

1/2 tsp cloves

1/2 tsp nutmeg

1 tsp vanilla

Directions:

  1. Combine all dry ingredients.
  2. Add eggs, milk, pumpkin and vanilla, reserving some of the milk (or water) until the end so you can get the consistency you desire.
  3. Heat pan or skillet over medium heat for several minutes to evenly heat the pan.  If you start your pan too hot, your pancakes will brown too quickly and result in a gooey center.  Flip when undersides are golden brown and repeat on other side.
  4. Serve with a slab of butter, a dusting of powdered sugar and some real maple syrup.


Pumpkin Week! Pumpkin Bread Perfection

Your search for the perfect pumpkin bread recipe is over! This is the epitome of sweet bread perfection.  It is really moist and dense and has a delicious crusty cinnamon-sugar topping….mmmm. I can never wait until fall for my first batch of pumpkin bread.  I usually make some for the neighbors too because it’s just too good not to make a loaf for everyone.

Ingredients:

3 cups all-purpose flour (or substitute with whole wheat)

2 cups white sugar

2 teaspoons baking soda

2 teaspoons pumpkin pie spice

1 teaspoon salt

1/2 teaspoon baking powder

2 cups pumpkin puree

2/3 cup vegetable oil

3 eggs, beaten

1 tsp vanilla

Topping

1/3 cup sugar

1 tsp cinnamon

Directions:

Mix all dry ingredients together.  I recommend either sifting them or using a whisk to mix them, there are so many spices and additions to the flour that it is a good idea to get it mixed really well.

Add pumpkin, vanilla, vegetable oil, and eggs.  Mix until no streaks of flour are visible. Confession time… I got completely distracted while making this batch (doesn’t take much) and l forgot to put the oil in!  Seriously, who does that? It’s the oil! The bread STILL came out fabulous! It was not quite as moist as usual but I was shocked at how little difference the oil actually made in this recipe.  As a result, your batter will appear a bit thinner than mine in the above pic, unless of course you decide to leave it out too. 🙂

Pour into two greased bread pans (8″).  Sprinkle cinnamon and sugar topping over each loaf. Bake at 350 for 50-60 minutes or until the top no longer appears wet and a toothpick inserted into the middle comes out clean.  Cool on for 10 minutes before removing from pan.  Cool on wire rack until you just can’t stand it anymore and you have to bust into one.

This recipe has been featured on the following awesome blogs.  Stop by and check them out!

justimagine-ddoc.com/food-and-drink/fall-inspiration-pumpkin-recipes/gallery/image/pumpkin-bread-perfection/

http://ladyslittleloves.com/2013/09/pumpkin-streusel-bread-muffins.html

Pumpkin Week!!! Homemade Pumpkin Puree

I can’t wait for each and every recipe I have coming up for you this week.  I am a huge fan of pumpkin everything so I have more than enough FABULOUS recipes to give you a full week’s worth of pumpkin heaven.

With my hubby gone hunting and the rainy season started, the boys and I decided we would head down to our local farm stand and pick up some sugar pie pumpkins for a day full of baking.    They had so much fun getting all of the “guts” out of the pumpkins and separating all of the seeds so we could roast them.

Now, I can honestly say, I cannot taste a HUGE difference in flavor between canned pumpkin and fresh pumpkin puree, but if you are looking for a really fun, cheap fall activity to stock up on puree (which is generally pretty expensive otherwise) for the season, this is definitely worth it the effort.

Ingredients:

1-2 sugar pie (or baking) pumpkins – your local farmer or grocer will be able to point you in the right direction.  They are generally small, round, pretty smooth pumpkins with little speckles on them.
I roasted 2 pumpkins and got 10 cups of puree (which is equivalent to 5 cans of puree) and at $2/pumpkin, it is much cheaper.

Directions:

Cut pumpkin in half, vertically.  These pumpkins are generally pretty firm so be careful.  I find that a bread knife or serrated steak knife work better than my big sharp chef knives.  Cut right up to the stem on both sides then break apart with your hands.  You should then just be able to grab the stem and break it off pretty easily.

Remove the “guts” as my boys would call it.  Be sure to scrap the inside well with a spoon to remove any of the stringy pulp.  Separate the seeds into a bowl and rinse. If you fill the bowl with water, the seeds will float and the pulp will generally sink to the bottom.  Lay on a paper towel to dry.  We will be roasting them later this week 🙂

Line large cookie sheet with aluminum foil.  Place pumpkin halves face down on cookie sheet.  Bake at 375 for approximately 90 minutes or until pumpkins are soft.  As you can see in my pictures, one of my pumpkins cooked much faster than the other so it was extra soft after it was baked.

Cool until you can handle them safely.  The skin of the pumpkin should peel off very easily.  After you have them peeled, cut into chunks and place into a food processor or blender.

Puree until very smooth.  Using a fine mesh strainer, strain excess liquid from puree.  It seems like the puree will just run right through but it won’t.  Don’t force it through the strainer, just let it drain naturally.  Let each batch drain for several minutes. *One of my blog followers recommends in the comments below to let the puree sit in the fridge overnight.  The liquid will all come to the top while the puree sinks to the bottom so if you are not planning on using it right away, this would be a really easy option. *

If you aren’t planning on using all of your puree now, divide it into freezer bags in 2 cup portions.  I like to fold the top of the bag over before I start measuring.  This will keep the top of the bag where you need a good seal from getting all gunky.  Press the excess air from the bag, label bag and refrigerate for 3 days or freeze for up to 6 months.

Fall Zucchini Bread

I LOVE FALL! I love everything about fall! I love the crisp foggy mornings, the smell of harvest candles burning throughout my house and  soups simmering on the stove. I love jeans, sweaters and boots especially because they cover my glaringly white skin (there is no  chance of getting any color when you live in the Pacific Northwest). I love the sound of football games playing in the background and my husband yelling at the TV and the “horrible refs ” and the .  Wait, where was I?… Oh yeah, foot ball games playing in the background, open windows and doors, falling leaves and I especially love the smell of all of the fall breads baking in my oven.

I majorly over-did it in my garden this year with the zucchini and squash.  I currently have 3 paper bags overflowing with them and can’t give them away fast enough.  I have frozen about as much as we could ever eat in a year and am still left with 3 full bags and more coming out of the garden! So let’s make some delicious Zucchini bread to kick off fall.

This recipes is wonderful.  It is sweet, spicy, moist and so healthy.  Okay, so maybe not healthy, but it does have veggies in it right? So at least when I eat half a loaf in one sitting I feel better than when I sit and eat a dozen chocolate chip cookies. Let’s bake!

Ingredients:

3 cups shredded zucchini (2-3 medium) – I like to squeeze some of the excess moisture out of my freshly shredded zucchini.

1 2/3 cups sugar

2/3 cup vegetable oil

2 tsp vanilla

4 eggs

3 cups all-purpose or whole-wheat flour

2 tsp baking soda

1 tsp salt

1 tsp ground cinnamon

1/2 tsp ground cloves

1/2 tsp baking powder

1/2 cup coarsely chopped nuts (optional)

1/2 – 1 cup chocolate chips (optional)

Directions:

Move oven rack to low position so that the tops of the pans will be in the center of the oven.  Heat oven to 350 degrees F.  Grease bottoms of 2 8-inch loaf pans with cooking spray or shortening.  I like using parchment paper because there is nothing more disappointing than turning out your bread only for the bottom half to stay in your pan.  You can also make them into muffins (which I love) for easy individual snacks.  I usually add chocolate chips to the second half of he batch so half can be for desserts and half can be for snacks.

Stir flour, baking soda, salt, cinnamon, cloves, and baking powder together in a small bowl. In a large bowl, stir zucchini, sugar, oil, vanilla and eggs until well mixed.  Stir dry ingredients into the zucchini mixture.  Stir in nuts and chocolate chips (optional).

Divide batter evenly between 8-inch pans or lined muffin tins (2/3 full).  Bake 8-inch loaves for 50-60 minutes or muffins for 20-25 minutes.  Be sure to keep an eye on the bread as it is baking (especially if you are making the muffins).  Every oven is different and sometimes you might fill your cups more or less than I did so keep your eye on them so you can be sure to catch them at their prime.  You will notice when they near perfection, the tops begin to have cracked look instead of a wet look. Before you go poking holes in your cake with toothpicks, just lightly touch it with your finger.  If it bounces back and leaves no imprint, it is ready to come out of the oven.  If the imprint remains, keep baking.  Again, touch lightly so you don’t make a big dent in your cake.  If it seems pretty firm, press just a little harder to be sure.  This seems to result in perfectly moist breads and cupcakes every time.  Sometimes it is really hard to tell with a toothpick.

Cool in pans on cooling rack for 10 minutes.  Loosen sides of loaves from pans; remove from pans and place top side up on cooling rack.  Cool completely, (yeah right) about 2 hours, before slicing.

Perfect Pizza/Calzone Dough

This pizza dough is fabulous! It is really quick and easy and tastes so wonderful.  I use it for making pizzas and calzones. It comes from the Pillsbury Complete Book of Baking (one of my top 5 favorite cookbooks).

Ingredients:

*makes 2 pizzas or 2 large calzones- please note, recipe was doubled in pictures)

2 and 1/2 to 3 cups of all-purpose flour (sometimes I replace 1 cup of the all-purpose with whole wheat flour)

1 tsp sugar

1 tsp salt

1 pkg. fast-acting yeast (or 2 and 1/4 tsp)

1 cup water

2 Tbsp olive oil

Directions:

In large bowl, combine 1 and 1/2 cups flour, sugar, salt, and yeast; mix well.  In a small saucepan, heat water until very hot 120-130 degree.  If you don’t have a thermometer, it should be hot enough to be a bit uncomfortable on your finger but not hot enough to burn.  You don’t want the water too hot or it will kill the yeast.  Add water and olive oil to flour mixture.  Blend at low-speed until well moistened; beat 2 minutes at medium speed.  By hand (or with dough hook on stand mixer) stir in an additional 1/2 to 3/4 cups flour until dough is smooth and elastic, about 3 to 5 minutes.

On floured surface, knead in 1/4 to 1/2 cup flour until dough is smooth and elastic, about 3 to 5 minutes.  Flour amounts can really vary dramatically based so add the flour until your dough is really soft and elastic but not sticky.  It really should not stick to your hands or your board.  If it does, add more flour. 

Place in a bowl that has been sprayed with non-stick spray then flip the dough over so some of the oil is on top, keeping the dough from sticking to the plastic wrap you are about to top it with 🙂 Top with plastic wrap and a cloth towel.  Let rise in a warm place until light and doubled in size (about 30 minutes).

For pizza, place oven rack at lowest position; heat oven to 425 degrees F.  If you have a pizza stone or stoneware cookie sheet, place it in the oven to get hot. Punch down dough several times to remove air bubbles.  Divide dough in half; If you are a pro at throwing the dough up in the air to shape it, you probably are not in need of a good dough recipe, so for the rest of us, a rolling-pin works just dandy. Place dough on pizza pan (adorned with a good sprinkle of corn meal) and top with your favorite toppings. If you are using pizza stone, prepare pizza on a transferable surface like one with a good dose of flour or corn meal so you can easily transfer it to your hot stone which also should get a little sprinkle of corn meal.  Bake for 20-30 minutes depending on the thickness of your toppings and your personal crispness preference.  Lift one of the edges up to see if the bottom of the crust has browned to ensure that the center is not doughy.

For Calzone, heat oven to 425 degrees F.  Punch dough down several times to remove air bubbles.  Divide dough in half.  Roll dough into a circle (doesn’t have to be perfect) on a well-floured surface. Fill one half of the circle generously with your favorite sauce and pizza toppings, leaving a good inch around the edges with no sauce or toppings .  We used pepperoni, pizza sauce, mozzarella cheese, pepperjack cheese, black olives and thinly sliced green peppers.  *Tip- obviously none of us eat pizza because it’s great for our waistlines, but I do pop my pepperoni in the microwave for a quick minute on a bed of paper towels to remove most of the fat.  It takes so much of the grease that I am always sopping up with a napkin out of the pizza but does not affect the taste or texture at all.   I do this with salami too.

Fold other side over toppings to form a half-circle and crimp the edges.  Roll edges inward, toward filling one pinch of dough at a time to make a fancy fluted edge.  It really doesn’t matter too much what it looks like at this point because once it bakes, the ones that are all pretty unbaked end up looking a lot like the ones that are just pinched together.  The most important thing is to just make sure that your edges are well sealed.  Brush top with egg white and cut a few vents in the top (just deep enough to penetrate the top layer of dough). Place on a pizza pan or hot pizza stone coated with corn meal.  Bake for 15-20 minutes or until nicely browned.  Top and bottom should be firm and brown.

Tip for freezing dough: To freeze 1 pizza crust, prepare as directed above.  Bake dough (with no toppings) at 425 degrees F for 15 minutes.  Cool.  Place in a moisture-proof freezer bag.  Freeze for up to 2 months.  Thaw before using and top with favorite pizza toppings.  Bake at 425 on lowest oven rack for 18-22 minutes or until crust is golden brown and toppings are thoroughly heated.

Rosemary French Rolls

I have a big time weakness for bread.  Italian restaurants are a serious danger for me.  Now, mix bread with a pinch of rosemary and for some reason, I just can’t stop myself.  This recipe comes from one of my favorite cookbooks “Pillsbury Complete Book of Baking”  My little family of four put down a dozen of them tonight and we wanted more.  They are so soft and moist on the inside but a little crunchy on top…mmmm…mmm…mmm!

Ingredients:

2 to 2 and 1/2 cups all-purpose flour

1 tsp sugar

1 tsp salt

1 pkg. fast acting yeast (or 2 and 1/4 teaspoons)

1 cup water

1 egg white, beaten

dried rosemary leaves, crushed

Directions:


In a large bowl, combine 1 cup flour, sugar, salt and yeast: mix well.  In a small saucepan, heat water until very warm (120-130 degrees).  Add warm water to flour mixture.  Blend at low-speed until moistened; beat 2 minutes at medium speed.  By hand, sir in an additional 1/2 to 1 cup flour until dough pulls cleanly away from sides of bowl.

On floured surface, knead in 1/2 cup flour until dough is smooth and elastic, about 5 minutes.  Place dough in greased bowl; cover loosely with plastic wrap.  Let rise in warm place until light and doubled in size, about 30 minutes. A good way to check if your dough is doubled in size is to do the “poke test.”  Poke your finger into the top of the dough.  If the dent stays, your dough is ready, if it bounces back, you need to let it keep rising.

Grease large cookie sheet. Punch down dough several times to remove all air bubbles.  Divide dough into 12 pieces; shape into balls.  Place on greased cookie sheet.  Cover with greased plastic wrap.  let rise in warm place until doubled in size, about 15 minutes.

Place shallow pan half full of hot water on lower oven rack. (I suggest getting it to your stove top and adding water there instead of trying to walk a cookie tray with water from your sink, trust me – I had to mop up my floor 🙂 ) Also, when you open the oven door after placing the pan of water in, don’t put your face anywhere near the oven door.  I think I permanently melted my maskara onto my eyelashes.

Heat oven to 425 degrees.  Uncover dough.  Brush rolls with egg white; sprinkle with rosemary.  Bake at 425 degrees for 14-21 minutes or until light golden brown.  Immediately remove from cookie sheet; cool on wire rack.

Beer Bread – Super Fast, Easy and DELISH!

My dear friend Amber introduced me to beer bread a few years back and it has since become my very favorite kind of bread.  It is so super easy.  Literally, your bread will be ready for the oven before your oven has even finished preheating.  This bread accompanies chilli, soups, salads, really anything because it is so versitile.  Let’s get started…

Ingredients:

3 cups self-rising flour (or 3 cups all-purpose flour, 3 tsp baking powder and 1 and 1/2 tsp salt). 

I know very few people who keep self-rising flour on hand.  Do not run out to buy some because you can very easily make it yourself.  For every cup of flour in a recipe, add one teaspoon of baking powder and 1/2 teaspoon of salt. Voila…That’s it!

1/3 c. sugar

1 – 12oz can or bottle of  beer.  I have tried several kinds of beer and it seems like the regular, light beers produce the best flavor (for my liking).  I do not like the taste of beer, especially microbrews so if that’s your thing, you may enjoy adding a fancier beer.  If you do add a microbrew, your bread will have that bitter flavor that the beer possesses.

Directions:

Whisk all dry ingredients together. 

Add beer.  It will be really foamy. Mix with a rubber spatula or a whisk.  Do not overmix or it will become tough. Once the beer is mixed in evenly, stop.  You want it to be a little lumpy.

Pour batter into greased bread pan. 


I think, hands down, that the old thin aluminum pans are  far superior to any non-stick fancy schmancy bread pan or cookie sheet. You can often find them at yard sales for $.10 each.  They produce such a nice, evenly browned crust.

Bake at 350 degrees for 50 minutes.

Spread a layer of butter or margarine (you decide how thick) over the top.  You can also melt it and spread it with a pastry brush if you have one. 

Place back in over for an additional 10 minutes.

Pull out of oven and transfer to a cooling rack.  This bread is best served warm but is still excellent leftover if you store it in a Ziploc and zap it in the microwave for a few seconds before smothering in butter. I prefer my bread topped with honey butter.

Variations:

For a savory bread, decrease sugar to 3 Tbsp and add cheese and garlic, garlic salt or roasted garlic cloves to batter.  You could add jalapeno and cheddar cheese to the batter or italian herbs and parmesan.

For a sweeter bread, alternate spoonfuls of batter into pan with cinnamon and sugar mixture.  Top with cinnamon and sugar before baking.