Drippin’ Delicious Chicken Tacos

IMG_3636

My husband and I recently completed 30 days of eating all whole, non-processed foods (on the Whole 30 plan).  I have never eaten so many vegetables, eggs and meat in my life, but surprisingly, we loved every single meal I made from the” Whole 30″ cookbook, the “Paleo Nom Nom” cookbook and the one that this recipe originated from “Against All Grain”.

I wanted to highlight one of my very favorite recipes that has now become a staple in our family – originally named “Crock Pot Chicken Tacos” in the cookbook, now named Drippin’ Delicious Chicken Tacos” by myself :).  I like to keep with the healthy theme and eat the tacos in a “lettuce tortilla” but my boys and husband now (post Whole 30) opt for the street taco feel with the little corn tortillas.  Either way, it will be one of those meals that you savor every single bite as the juice literally runs down your arm.

One of the reasons this recipe ranks at the top of my favorites list is because it is SO SO EASY! You literally throw the frozen chicken, salsa and spices in a crock-pot, turn it on, go about your day. BOOM! You have a meal.  I know we all appreciate being able to eat healthy and not have to slave in the kitchen all day.

The recipe calls for 1 lb of boneless, skinless chicken breasts as well as one pound of boneless, skinless thighs (which have become one of my favorite meats to cook with in the crock pot).  I had gotten a crazy deal on organic vacuum sealed BS thighs at one of our natural grocers so I bought about 20 lbs of it.  After using the first pack for stir fry one night, I was a little put off by the amount of fat that I had to cut through so the rest sat in my freezer for a couple of months until I tried this recipe.  Crock pot is the way to go for this inexpensive cut of meat! It just melts the fat away and makes really tender juicy chicken.  If you cannot find the thighs, feel free to just use all breast.


Ingredients:

1 lb boneless, skinless chicken thighs (these can be difficult to find so use all breasts if you need to)

1 lb boneless, skinless chicken breasts

1 14-oz container of fresh salsa (For Whole 30 purposes, check the ingredients to ensure there is no sugar or preservatives)

1 Tbsp cumin

1 Tbsp chili powder

2 1/2 tsp coriander

2 tsp sea salt (I absolutely love the Pure Himalayan Sea Salt – the pink stuff)

1/2 tsp cayenne pepper

1/2 tsp black pepper

*note – the original recipe called for 3 cups diced tomatoes in juices, 1 small yellow onion, diced, 4 garlic cloves, minced, 2 Serrano chilies, seeded and chopped and 2 Tbsp chopped cilantro but since almost all of these things are in a good fresh salsa, I just subbed the container of salsa with fantastic results*


Directions:

Place the frozen (or defrosted) chicken in the crock pot.  I did not trim any of the fat because most of it will melt away anyways, then I find it much easier to pull off the larger chunks while I am shredding it.

FullSizeRender (5)

Now dump a container of your favorite fresh salsa over the top of the chicken.

FullSizeRender (7)

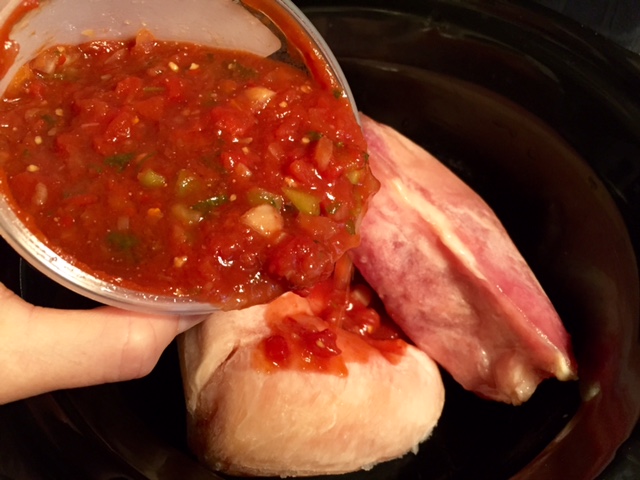
I know, pretty difficult, huh?

Now, add all of your spices right on top. You still with me?

FullSizeRender (6)

So many spices!!! Soooo much flavor!

Okay, plug in your crock pot if you haven’t already (I only put this little reminder in here because mine sat out on the counter for about 45 minutes today before I realized it was unplugged – HA!) Crank that baby up to high heat and walk away.  About 2 hrs into the cooking process, I usually break up the chicken from the giant frozen clumps as it will be mostly defrosted by now. Is your mouth watering yet? FullSizeRender (8)

Let that baby sit for another 3-4 hours then shred. If you are using defrosted meat, obviously your cooking time will diminish significantly (I would lessen the cooking time by 1.5 hrs). If you are throwing this on before work, and plan to be gone for longer than 5 hours, place on low and cook for 8-9 hours.

FullSizeRender (13)

Once the chicken is tender enough to shred, pull out the thighs (if you are using them), and shred, removing any small bits of fat remaining.  Shred the breasts and place it all  back into the pot of juices.  Use tongs to squeeze the chicken out before placing in your lettuce boat or tortilla.  Top with avocado, salsa, cilantro.  If you are not interested in keeping it Whole 30, add some shredded cheese and sour cream.  Be sure to eat this over a plate as you will have a little pool of savory juices when you are through.  Makes great leftovers!  Also, try it on some greens as a salad. So good!

Drippin' Delicious Chicken Tacos

  • Servings: 6-8
  • Difficulty: Easy
  • Print

IMG_3636

Ingredients:

1 lb boneless, skinless chicken thighs

1 lb boneless, skinless chicken breasts

1 14-oz container of fresh salsa

1 Tbsp cumin

1 Tbsp chili powder

2 1/2 tsp coriander

2 tsp sea salt

1/2 tsp cayenne pepper

1/2 tsp black pepper

Directions:

  1. Place frozen chicken in the crockpot.
  2. Add salsa and spices.
  3. Cook on high for 1 hour then separate chicken breasts and thighs.  Cook for an additional 5-6 hours until chicken is tender enough to be shredded easily.  (You can also just place the chicken in the crockpot and cook on low for 8-9 hours if you are going to be gone).
  4. Remove chicken from crockpot and shred.  Remove any fat pieces from chicken thighs.  Add back to juices in crock pot.
  5. Squeeze chicken with tongs to drain some of the juice before placing it in lettuce leaves (for Whole 30/Paleo/GF) or tortillas.
  6. Top with avocado, salsa, and cilantro (and cheese and sour cream if your not trying to stay Whole 30 compliant).

Creamy Chicken Alfredo

Chicken Fettuccini Alfredo

Your friends and family will be dazzled by this wonderfully creamy, garlicky, Alfredo with a hint of Parmesan.   I have several friends who request this meal every time they come to visit for dinner and it ranks up in my husband top 5 favorite meals.  Even the most amateur cook can perfect this dish with these few helpful hints.

Ingredients:

2-3 chicken breasts

1-2 tsp olive oil

Freshly ground black pepper

Kosher salt

1 box Fettuccine noodles – I know, don’t laugh at my picture… I forgot to get fettuccine at the store so spaghetti was the next best thing 🙂 You probably didn’t even notice until I voluntarily ratted myself out.

Alfredo Sauce:

2 Tbsp olive oil

2 Tbsp butter

1/4 cup all-purpose flour

4 cups milk or half and half (or a mixture of the two depending on how creamy you are wanting your Alfredo)

1/2 cup freshly grated Parmesan cheese

1/2 tsp garlic salt

1/2 tsp freshly ground pepper

salt to taste

Directions:

Heat large pot of water on high heat.

IMG_3758IMG_3766

Trim fat off of chicken breasts.  Rinse and pat dry with paper towels.  Butterfly breasts in half lengthwise. Season  with a small pinch of kosher salt on each side as well as some freshly ground  pepper.

IMG_3772

Heat olive oil over medium-high heat in a heavy bottomed pan.    When pan is good and hot, arrange chicken in pan.  Make sure you don’t add so much to the pan that it drastically cools down.  This will cook the juices right out of the chicken and you will be looking at rubbery boiled chicken. Once you see that the breast is cooked about half way through, flip the chicken, ensuring that there is a good golden crust on the bottom. Cook until the chicken feels firm in the thickest area of the breast (start by feeling the thinnest area of the breast.  You will feel how firm it is when it is cooked.  Make sure the thickest part feels that firm too).  Or if you aren’t comfortable with that, cook it to 160 degrees F.  Remove chicken from pan and cover.  Let rest for 5-10 minutes.  This allows all of the juices that rush to the center while cooking to redistribute throughout the chicken again. 

While meat is “resting, ” add noodles to water.  Be sure to stir every few minutes.

Roux - butter and oil Roux Add Flour Roux Add milk Parmesan Thickened sauce

Melt butter and olive oil together over medium-high heat.  Add flour to make a roux.  Once your roux starts turning a golden color, slowly add the milk/half-and-half, stirring constantly.  Continue to stir until the sauce is hot and is thickening.  Add Parmesan.  Stir and continue to heat until it reaches the desired thickness.  Add garlic salt and pepper.  Taste the sauce to determine the amount of salt you want to add.  I add at least a couple of pinches of salt but you might not prefer yours as salty.

Slice chicken and serve over pasta with your Alfredo.  Top with Parmesan if desired.

This sauce is also awesome as an appetizer for dipping. Serve with your favorite crusty french bread.

Pumpkin Week!!! Homemade Pumpkin Puree

I can’t wait for each and every recipe I have coming up for you this week.  I am a huge fan of pumpkin everything so I have more than enough FABULOUS recipes to give you a full week’s worth of pumpkin heaven.

With my hubby gone hunting and the rainy season started, the boys and I decided we would head down to our local farm stand and pick up some sugar pie pumpkins for a day full of baking.    They had so much fun getting all of the “guts” out of the pumpkins and separating all of the seeds so we could roast them.

Now, I can honestly say, I cannot taste a HUGE difference in flavor between canned pumpkin and fresh pumpkin puree, but if you are looking for a really fun, cheap fall activity to stock up on puree (which is generally pretty expensive otherwise) for the season, this is definitely worth it the effort.

Ingredients:

1-2 sugar pie (or baking) pumpkins – your local farmer or grocer will be able to point you in the right direction.  They are generally small, round, pretty smooth pumpkins with little speckles on them.
I roasted 2 pumpkins and got 10 cups of puree (which is equivalent to 5 cans of puree) and at $2/pumpkin, it is much cheaper.

Directions:

Cut pumpkin in half, vertically.  These pumpkins are generally pretty firm so be careful.  I find that a bread knife or serrated steak knife work better than my big sharp chef knives.  Cut right up to the stem on both sides then break apart with your hands.  You should then just be able to grab the stem and break it off pretty easily.

Remove the “guts” as my boys would call it.  Be sure to scrap the inside well with a spoon to remove any of the stringy pulp.  Separate the seeds into a bowl and rinse. If you fill the bowl with water, the seeds will float and the pulp will generally sink to the bottom.  Lay on a paper towel to dry.  We will be roasting them later this week 🙂

Line large cookie sheet with aluminum foil.  Place pumpkin halves face down on cookie sheet.  Bake at 375 for approximately 90 minutes or until pumpkins are soft.  As you can see in my pictures, one of my pumpkins cooked much faster than the other so it was extra soft after it was baked.

Cool until you can handle them safely.  The skin of the pumpkin should peel off very easily.  After you have them peeled, cut into chunks and place into a food processor or blender.

Puree until very smooth.  Using a fine mesh strainer, strain excess liquid from puree.  It seems like the puree will just run right through but it won’t.  Don’t force it through the strainer, just let it drain naturally.  Let each batch drain for several minutes. *One of my blog followers recommends in the comments below to let the puree sit in the fridge overnight.  The liquid will all come to the top while the puree sinks to the bottom so if you are not planning on using it right away, this would be a really easy option. *

If you aren’t planning on using all of your puree now, divide it into freezer bags in 2 cup portions.  I like to fold the top of the bag over before I start measuring.  This will keep the top of the bag where you need a good seal from getting all gunky.  Press the excess air from the bag, label bag and refrigerate for 3 days or freeze for up to 6 months.

Basil and Parmesan Orzo (Fancy Homemade Rice-O-Roni)

What a wonderful last five days it has been for me.  I love my kids more than anything, but it isn’t until I became a mother that I realized the value of absolute silence.  My boys, 4 and 6 (along with their two cousins, 6 and 9, also boys) got to take a five-day camping trip to the coast with their Grammie and Papa (Yeah, I know, they were brave grandparents).  While I missed my boys dearly and worried about them constantly, I was completely caught off guard with how much I enjoyed the silence I experienced for those five days.  No whining, no fighting, no yelling… just the faint sound of the fountain splashing in our pond…. aaaahhhhhh…. I completely organized and deep cleaned our house and re-arranged a bunch of our furniture.  My hubby and I went out on several dinner and lunch dates and even skipped our workouts and went straight for the sauna and hot tub at the gym.  I needed that time so much to rejuvenate me.  And now that my sweet, crazy boys are home, their yelling and fighting is met with a much softer, more understanding mommy.

So, I’m sure many of you are asking “What in tar-nation is Orzo?” Am I right? Okay, maybe you didn’t use the word “tar-nation.”  For those of you who have never heard of Orzo, it’s time you experienced the wonderfully versatile pasta that is shaped like a slightly larger grain of rice.  You can find it in any grocery store in the pasta aisle or some grocers carry it in their bulk section.  On of my friends (Miss Katie) also makes a killer cold Orzo salad with cucumbers and feta and some kind of dressing… yumola!

This recipe is one of our family’s favorites because it tastes a lot like the Rice-O-Roni (“the San Fransisco Treat!” …maybe I am dating myself a bit here..) but waaaaayyyy better.  Anyways, bottom line, Rice-O-Roni tastes delish in a Kraft Mac ‘n’ Cheese kind of way but it is one of those boxed food items that probably has more preservatives and terrible stuff for you in it than it does good stuff.  Here is where the boxed treat meets gourmet. This recipe would go over as a side with just about any meal from burgers to roasted lamb.  It’s fabulous and just as fast as the boxed stuff.

Ingredients:

2 Tbsp butter

1 cup uncooked Orzo pasta

1 (14.5 oz) can chicken broth – or 2 tsp chicken base and slightly less than 2 cups of water.

1/2 cup grated Parmesan cheese

1/4 cup chopped fresh basil (or 1 and 1/2 Tbsp dried basil)

salt and pepper to taste

fresh basil and Parmesan for garnishing

Directions:

Melt butter in a heavy skillet over medium-high heat.  Stir in Orzo and saute until lightly browned.

Stir in chicken broth and bring to a boil. If you are using dried basil, add it now, if using fresh, wait.  Cover.  Reduce heat and simmer until Orzo is tender and liquid is absorbed, about 15-20 minutes.

Mix in Parmesan cheese and basil (if using fresh).  Season with salt and pepper.  Transfer to shallow bowl.  Garnish with fresh basil sprigs and shaved Parmesan.

As always, I like to give credit where credit is due.  I found this recipe a few years back on allrecipes.com, submitted by DODIEPAJER.

Succulent Crab Cakes

As the season of summer is coming to a close and school is on the horizon, I find myself a little sad that the chapter of our lives where the boys are at home during the days are coming to a close.  Wyatt will be starting first grade and Henry will be starting preschool 3 days per week.  But in all total honesty, summer is making me a tad crazy.  My boys love each other and for the most part play very well together but something about being together every single day for months on end is wearing on them.  I think they have been fighting more than getting along lately and it is making this momma feel frazzled.  Have you ever yelled at your kids to stop yelling??? Did that today.  One of those things that as soon as it comes out of your mouth, you think “Did I seriously just do that?” They were fighting in the car so loud that I yelled even louder “SSTOOOP  YELLING!!!” Haha! Good example I set today for them.  One of those finer moments as a mom where you really shine 😉

Okay on to good food…One thing is for certain… I LOVE crab! I love the anticipation of cracking all of the legs and getting to little nuggets of salty, sweet meat.  I have to say, as much as I love fresh crab, crab cakes take it to another level and are seriously one of the best foods on the planet (in my opinion of course).  The secret to a great crab cake is lots of crab and not much in the way of other fillers.  Simplicity is key.

If you are buying crab that is still in the shell (crab legs), please know that the weight ratio is about 1/2 meat, 1/2 shell.  So, if you want 1 lb of meat, you need to buy 2 lbs of crab legs.

Ingredients:

8 saltine crackers

2 Tbsp mayonnaise

1/2 tsp Dijon Mustard

1/2 tsp Old Bay Seasoning

1/4 tsp Worcestershire Sauce

1 egg, beaten

salt to taste

1 pinch cayenne pepper

1 lb crab meat

1/4 cup dry bread crumbs or Panko breading

2 Tbsp butter


Directions:

Crush saltine crackers.  Add mayo, Dijon, Old Bay, Worcestershire, egg, salt, and cayenne.  Mix thoroughly.  Fold in crab being very careful not to break up the chunks.  The bigger the chunks of crab, the better.  Refrigerate for 20 minutes to allow the ingredients to absorb.

Make patties as large or small as you desire.  They will be very fragile since there aren’t many fillers.  Place crab cake on top of a bed of bread or Panko crumbs.  Sprinkle crumbs and pat to make them stick.  Carefully flip over and coat other side.  Melt 2 Tbsp butter in a heavy skillet (I highly recommend cast iron, but if you don’t have it, a regular pan will work fine). Heat your butter over medium-high heat until it is good and bubbly hot but not so hot that it is turning brown.  Carefully place four cakes at a time into the butter.  Let crab cake brown for several minutes before flipping. Because the egg is now solidifying, your cake will become a bit less fragile.  Be sure your crab cake is nice and brown before you flip it.  Brown the other side. The crab is already pre-cooked so you do not need to get it to a certain temperature, you are just browning the outside. Place on a paper towel in a warm place (preferably a warm oven) until all of the crab cakes are cooked.  Do not cover with foil to keep warm if you can help it because you will be allowing steam to build up, therefore making your breading soggy.  Dry heat is best.  Serve with a fresh lemon wedge and your favorite tartar sauce.


Amazing Cheeseburger Pie

A few days ago, my husband brought a letter home for me from a co-worker named Vicky.  Enclosed, along with the sweetest letter was a recipe for cheeseburger pie.  Upon first glance, the recipe seemed a little plain but I knew if Vicky had included it, it must be something I had to try.  I bought all of the ingredients and made it the next day.  It was very easy to throw together and made the most delicious comfort food I have had in a long time.  It was truly fabulous and will forever be a staple in our home.  Vicky, I can not thank you enough for sharing such a wonderful recipe with me (and for giving me permission to share).

Ingredients:

1 package of pre-made pie crust (feel free to make your own.  I had never used pre-made before but was pleasantly surprised at how good it was since I am generally not a big fan of the pre-made crusts/doughs. You can also use 2 packages Crescent rolls, just remember to grease your pan if you do.

1 lb ground beef

1 cup (8oz.) tomato sauce

1 medium onion, chopped

1 can mushrooms (optional)

1 small can sliced black olives

2 eggs

7 slices of cheddar or American cheese

salt and pepper to taste

Directions:

Place one crust in the bottom of your pie pan.  Push it against the sides to secure it.  If you are using crescent rolls, use one package for the bottom crust, pinching the seams together.

Brown hamburger with onions.  Add mushrooms.  Drain hamburger and add olives and tomato sauce.  Add salt and pepper here too to taste. Heat until warm, pour onto bottom crust.

Beat one egg and one egg white well (do not discard the unused yolk).  I have never owned an egg separator because I feel like my fingers work just as well and it dirties one less dish.  Just crack the egg in half, removing the top half of the shell over a bowl.  Turn the egg out into your fingers and let the white fall through your fingers.  Drop the yolk back in the half shell until you are ready to use it.

Pour egg over the top of the hamburger mixture.  Add cheese slices, laying evenly across the top.

Place top crust over hamburger.  Fold edges over the bottom crust and pinch them together until the whole thing is sealed.  Crimp edges using the knuckle of your left hand (or right if you are a lefty) and pinch with your right hand around the whole crust.

Brush egg yolk over the top of the crust and cut slits in the top so your pie can vent.

Bake at 325 degrees F for 40-50 minutes until it is nice and golden brown.  Let the pie cool for 10 minutes, then serve.

Three Cheese Vegetarian Lasagna

I created this recipe a few years back when I was asked to provide a vegetarian dish for an event I was catering.  I am a meat and potatoes kind of girl so I don’t cook many vegetarian dishes.  I tested the recipe out on a few friends and my hubby who are all complete meat lovers and they all loved it.  After the catering event, I kept receiving comments about how big of a hit the vegetarian lasagna was.  Even though there were only a handful of vegetarians attending, the 2 giant pans I made were devoured.  I know there are so many people going meatless these days so this is a great recipe to add to your collection.  It is really hearty and has a great dept of flavor so even if you are not a vegetarian, you will love it.

Ingredients:

9-12 lasagna noodles (I like the wavy kind because they give your dish more body).

2 Tbsp olive oil

1 can NON-marinated artichoke hearts

1 cup chopped onion

1 and 1/2 Tbsp minced garlic

6 cups fresh spinach

1 heaping cup of mushrooms of your choice (or more if you would like), diced

3 cups cottage cheese (or ricotta if you prefer)

2/3 romano cheese, grated

1 tsp salt

1 tsp dried oregano

1 tsp dried basil

1/2 tsp pepper

1 egg

3 cups mozzarella, grated

1 cup parmesan, grated

1 egg

1 jar of your favorite spaghetti sauce

Directions:

Pre-heat oven to 350 degrees F.

Boil noodles with 1 Tbsp salt.  Drain. Set aside.

Grate cheeses

Clean mushrooms by rubbing them with a wet paper towel from the top-center, down as they have tiny little fibers that get all ruffled if you go against the grain.  Don’t run water over your mushrooms because they will absorb the water.  When your picking out your mushrooms, make sure you choose ones that are completely sealed under the cap, are firm and have no bruises. Trim off the end of the mushroom and dice.

Drain artichokes and run your knife through them a few times to break them up.

Chop onions.  Remember that the closer you get to the core on the root end, the more gases the onion releases (making you cry), so with the root side down, make 1/4-1/2″ incisions down into the onion being careful not to cut all the way through turn 90 degrees and repeat.  Turn onion on its side and slice through making perfect little tiny squares. No tears.

In a skillet, over medium heat, cook mushrooms, artichokes, onions, and garlic in olive oil until onions are tender.  Drain any excess liquid and set aside to cool.

Measure spinach into a microwave-safe bowl.  Microwave on high for one minute.  Let stand in microwave for another minute or two then remove and squeeze the spinach, draining all of the juice.  You will notice that your six cups of spinach has now reduced to less than 1 cup. This is an important step because you don’t want any extra liquid in your lasagna or you will end up with soup that runs all over your plate.   Chop drained spinach.  If you are a spinach lover, feel free to use as much spinach as you want, just be sure it is drained thoroughly.

Combine cottage cheese (or ricotta if you choose), romano cheese, chopped spinach, salt, oregano, basil, pepper and egg.  Mix just until combined.  Add artichoke mixture and beat on low-speed for one minute.  Some cottage cheeses are runnier than others so if your cottage cheese has much liquid in it, drain it using a mesh strainer.  Just stir it in the strainer over a bowl and the milky liquid will drain out.

Spread a thin layer of sauce over bottom of 9×13 pan.  This will ensure that your noodles to stick to the bottom. Lay 3 noodles down onto the sauce.

Split your cottage cheese mixture into three equal parts.  Spread one part onto noodles.  I find that using my hands is the most efficient method.  I just kind of sprinkle it on there and then spread it evenly with a rubber spatula.

Top cottage cheese mixture with 1/3 of the remaining sauce.

Sprinkle with 1/3 of grated mozzarella and parmesan.

Repeat layering process starting with noodles 2 more times. (Okay, don’t tell anyone but I cheated and stacked 2 pieces of lasagna on top of each other for the main picture.  If you want your lasagna that thick, you will need to use a deep pan like a roasting pan and double your ingredients :))

Spray a piece of aluminum foil with non-stick cooking spray (VERY important, otherwise half of your cheese ends up on your foil.)

Cover and bake for one hour at 350 degrees.  Remove foil and bake for an additional 10 minutes.  Remove from oven and cool for 15 minutes before cutting and serving, allowing the lasagna to set up properly. Serve with rosemary french rolls and a side spinach salad.

Grilled Wild Turkey Rolls

Since I have been the queen of slacking on my blog lately, I decided that since I had reached over 10,000 views, I really need to get back in the saddle and give all of my amazing faithful followers some more yummy recipes.  Would you believe me if I told you that I was just giving you all time to try all of my recipes for the past month so I wouldn’t overwhelm you with new recipes? ….No?… Well, it was worth a try 🙂 My camera is at maximum capacity with all of the pictures of the yummy recipes I have for you.  If I only had a little elf who could take all of the thoughts and recipes out of my head along with the pictures from my camera and post them for me.

This recipe was so off the charts-amazing! My husband, Shawn went turkey hunting in Kansas City and brought home a beautiful giant turkey.  I had no clue what to do with it as I have never cooked wild turkey before.  Word on the street was, I had to marinade the breasts, cube it and wrap it in bacon with a slice of jalapeno.  I didn’t know what marinade to use so I made one myself and the whole package was dyne-o-mite!

Of course, most of us don’t have wild turkey breasts readily available; however, I am totally convinced you could wrap anything in bacon and add a jalapeno and it would be fabulous.  I also heard that adding a little cube of cream cheese in the middle makes them Turkey Poppers *drool*.

Ingredients:

Marinade:

1/4 cup olive oil

2 Tbsp white vinegar

2 Tbsp Worcestershire Sauce

1/2 tsp ground pepper

2 cloves minced garlic or 1 tsp garlic powder

1 tsp salt

1 Tbsp brown sugar

1 lb thick cut peppered bacon.  You will get 2 rolls for each piece of bacon so plan accordingly with the number of mouths you will be feeding.  I ALWAYS buy my bacon at the butcher counter.  At most grocery stores, you can find super thick, meaty, peppered bacon for right around the same price (or cheaper when it’s on sale) as the pre-packaged bacon where you get 2 square inches of a window to guess if the bacon actually looks that good or if they have laid it in such a way that the only actual meat on the bacon is showing in that little window.  Seriously, that just isn’t fair.

1 can pickled, sliced jalapenos.  If you are not a big fan of super spicy stuff, get the “tamed” jalapenos.  They still have all that yummy flavor without lighting your mouth on fire.

1-1 and 1/2 lbs wild turkey breast or meat of your choice. Again, plan accordingly with your bacon slices.  You will be cutting your meat into 1 and 1/2″ cubes.  I think sirloin, chicken breast, turkey breast, and venison would all be really delicious choices.   The turkey breast I used was somewhere around 2-3 lbs so I had about 1 lb extra marinated meat I just froze for next time.

Directions:

Cut meat into 1 and 1/2″ cubes.  Mix marinade.  Let meat marinade for a minimum of 2 hours. (Seriously, check out that giant turkey breast! It took up my entire cutting board!)

Cut each piece of bacon in half.  Place one slice of jalapeno and once cube of turkey into center of bacon slice.  Tightly roll bacon over turkey and hold in place with a toothpick.

After cleaning your grill, heat grill to medium heat (around 300-350 degrees).  Place rolls on sides and cook slowly turning every few minutes.  Be sure to keep a spray bottle handy because you will be chasing flare-ups from the bacon grease the entire time.  Once, the bacon is fully cooked, your meat should also be fully cooked.  Let stand for 5 minutes before serving.  If you are making these for party favors, they will stay plenty juicy in a warm oven until ready to serve.  They are also really amazing the next day so don’t throw out your leftovers!

Simply Delicious Vegetable Barley Soup

A few weeks ago, I was at one of my favorite restaurants, dying to have a bowl of their always-amazing soup and a few slices of their homemade bread.  I asked what their “Soup of the Day” was and as she said “Cream of Broccoli and Vegetable Barley,” I felt the wind quickly escape my sails.   Neither of them sounded good to me since I have never been a big broccoli fan and though I had never had it, the barley soup just didn’t sound appealing.  I was really hoping for German Potato or Clam Chowder… something hearty, but I reluctantly ordered the vegetable barley soup because I like their homemade bread and real butter so much.  I was so glad I ordered it because I LOVED it!  I attempted to replicate it tonight and was so excited when I took my first bite.  I actually liked it even more than the soup I was served at the restaurant.  It is really savory and  surprisingly hearty, but really healthy at the same time.  This was a quick soup to throw together, however, it does have to cook for 90 minutes so it takes a little while to get to the end product.  I’m sure this would be great in the crock pot too.

Ingredients:

8 cups water

2 Tbsp chicken base (or use 8 cups chicken broth)

1 cup uncooked barley

1 onion, chopped

2 stalks celery, chopped

2 large carrots, chopped

1 tsp salt

1/2 tsp pepper

1 tsp sugar

1 tsp Worcestershire Sauce

1 tsp garlic powder

1/4 cup fresh parsley, chopped

1 tsp paprika

3 bay leaves

Directions:

Prepare all vegetables.  In a large pot, combine hot water and chicken base (or broth).  Add barley, chopped vegetables and spices.

Bring to a boil over medium-high heat then cover and reduce heat to medium-low.  Simmer for 90 minutes.  Feel free to add more veggies if you please (stewed tomatoes, zucchini, mushrooms, green beans, etc.)  Also, beans and/or some pre-cooked beef would be great additions.


Tuna Pizzas

Alrighty, as I mentioned in my previous post, I wanted to share 2 beloved recipes from my childhood, both including the infamous fish of the tuna variety.  This recipe always gets big cheers from my boys. It is also wonderful for those nights when the last thing you want to do is stand in your kitchen preparing a meal that is followed by a sink full of dishes.

 Ingredients:

2-7 oz cans tuna fish (again, I use solid white albacore but any kind works)

3 English muffins, split

1/4 cup mayonnaise (I really like the mayonnaise made with olive oil)

6 slices of cheddar cheese

1 thinly sliced tomato (optional)

salt and pepper to taste

Directions:

Start by lining a baking sheet with foil for easy clean up.  Mix together tuna, mayo, salt and pepper.

Divide tuna mixture onto 6-split muffin rounds and place on baking sheet.

Top with cheddar cheese.

Bake at 375 degrees for 10-15 minutes or until cheese is melted and bubbly.

Serve with sliced tomatoes, a little sprinkle of salt and pepper and some oven fries (loving sweet potato fries! I have a recipe awaiting trial that I will hopefully be blogging in the near future).